NuGrid
NuGrid website
#Virtual and Real Machines for NuGrid Codes
In order to run all of the NuGrid codes and tools your computer must be properly configured. One way to get started is to use a virtual machine that can be deployed independently of host operating system. This is a great way to try out installation, compilation and running. In the following we describe two options:
- follow the steps to install the required software while building your own virtual machine from scratch
- use the pre-configured virtual machine Nubuntu16
Build your own VM
Lubunutu 16.04 VirtualBox VM
Start with Lubuntu 16.04 and install this into an Oracle VirtualBox virtual machine. Then install the following software stack.
apt-get packages
Make sure you select the upgrade/update option during installation and/or start with
sudo apt-get update
sudo apt-get upgrade
sudo apt-get autoclean
sudo apt-get autoremove
Then start adding things:
sudo apt-get install make gcc dkms
sudo apt-get install emacs gfortran
virtual box additions
To make the VM work nicely, e.g. adaptive screen resolution install the VBox additions. First attach the virtual optical drive in the VM Devices menue. Then do
sudo sh /media/fherwig/VBOXADDITIONS_5.0.26_108824/VBoxLinuxAdditions.run
At this point you should shut-down the VM.
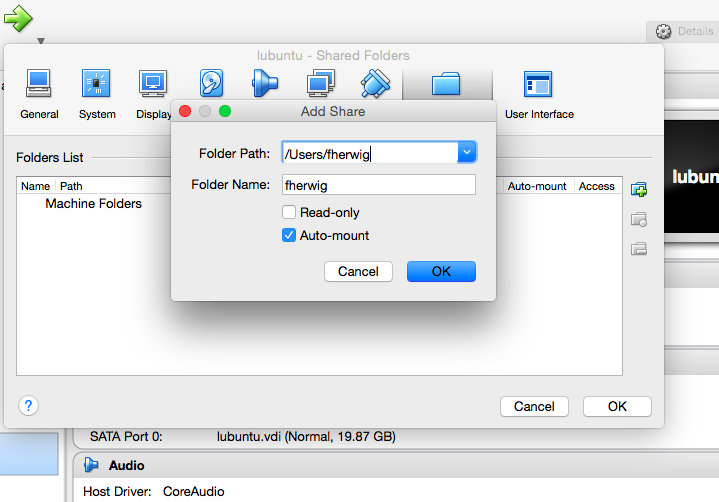
shared dir with host and CADC
Before you restart go to Settings and Shared Folders and add a directory from your host home dir, or even the entire home dir as a shared folder. Select Auto-mount and remember the folder name.
Now boot the machine. Then mount the shared folder:
- in your home dir create a mount point, e.g.
mkdir fherwig_host - then issue the mount command:
sudo mount -t vboxsf -o uid=1000,gid=1000 fherwig /home/fherwig/fherwig_hostin your local dir your host home dir (or whatever you have specified in your Shared Folder settings, will now appear in the mount point directory. You will have to do the second commen each time you reboot your VM. So you may want to add the mount command as an alias to your.bashrcfile.
You may also want to add an alias to .bashrc to mount the NuGrid VOspace volume on CANFAR:
alias mnt.vos="mountvofs --readonly --cache_dir=/tmp/vosCache --cache_limit=2000 --mountpoint=/tmp/nugrid --vospace=vos:nugrid"
Don’t forget to make the mount point needed for the mount command:
$ mkdir /tmp/nugrid
Remember that presently (as of Oct 9, 2016) CANFAR VOS does not support Python 3 (see below how switch between Python 2 and 3 using the Anaconda distribution.
git and repos
Install and configure git:
sudo apt install git
git config --global user.name "Falk Herwig"
git config --global user.email "fherwig@uvic.ca"
In order to access your git repos on github you need to add your id_rsa key to your VM. If you have mounted your host home dir (see above) you have access to your ssh key from your host, the public version of it you will probably already have uploaded to github. Make a directory .ssh in your VM home dir and copy the private ssh key from your host to your VM:
cp ~/fherwig_host/.ssh/id_rsa ~/.ssh
Now you may clone repos to your VM or go to your repo dir in your mounted host filesystem. Start installing some repos:
mkdir Repos
cd Repos
git clone git@github.com:NuGrid/NuSE.git
git clone git@github.com:NuGrid/NuGridPy.git
git clone git@github.com:NuGrid/NuPPN.git
Linear Algebra
To run the NuGrid NuPPN codes you need something like openblas, see the corresponding NuPPN wiki page: .
As an example, installing openblas from scratch:
git clone https://github.com/xianyi/OpenBLAS
cd OpenBLAS/
make FC=gfortran
sudo make PREFIX=/usr/local install
Alternatively, for example you may use the package installer:
sudo apt-get install libopenblas-dev
python
You will need some python. Here we use the Anaconda distribution which has everyting except the future (or futures) package:
- Download Anaconda: https://www.continuum.io/downloads#linux
- install:
bash ~/Downloads/Anaconda3-4.1.1-Linux-x86_64.sh - you will likely want to create a python 2.7 virtual environment as well using conda:
conda create -n py27 python=2.7 anaconda
Latex
In order to use the NuGrid Paper template install the following packages using the sudo apt-get install command:
texlive-latex-basetexlive-latex-recommendedtexlive-publishers
Some of these installation steps appears to take a little longer. You can use the evince program to look at pdf files.
MNRAS requires packages newtxtext and newtxmath which may require
to install TexLive
2016 which takes a
moment but should be straight forward.
Markdown
To edit markdown files you can use emacs or whatever your favourite text editor is. For a two-pannel view download the .deb package of the Remarkable markdown editor. Double-click on the .deb file in the file manager to install.
Nubuntu16 virtual machine
Nubuntu16 is a virtual drive created with the intent of making use of NuGrid tools a breeze for new or casual users.
- In order to install it go to this link and follow the download instructions.
- Next, you will need a copy of the Nubuntu16 VM zip directory. You can get this here.
- Once you download and unzip the directory you simply have to click on Nubuntu16.vbox which will automatically launch the VM. Otherwise you can launch it via the VirtualBox Manager.
- On the desktop you will find a file entitled “README.md” This will guide you to download a copy of the NuGrid SVN repository, and gives clear instructions on how to compile ppn.